How to: Apply Audio Redactions to Different Audio Channels

We have a request to redact just one audio channel of the file we are working on. How can we achieve this inside CaseGuard?

Applying audio redactions to different channels within CaseGuard can be done in two ways- either manually or using transcription.

How to Apply Audio Redactions to Different Channels (Manual Method)

  • Add your audio or video file to CaseGuard Studio.

  • Once loaded, click Manual Audio from the Toolbar on the left side of your workspace.
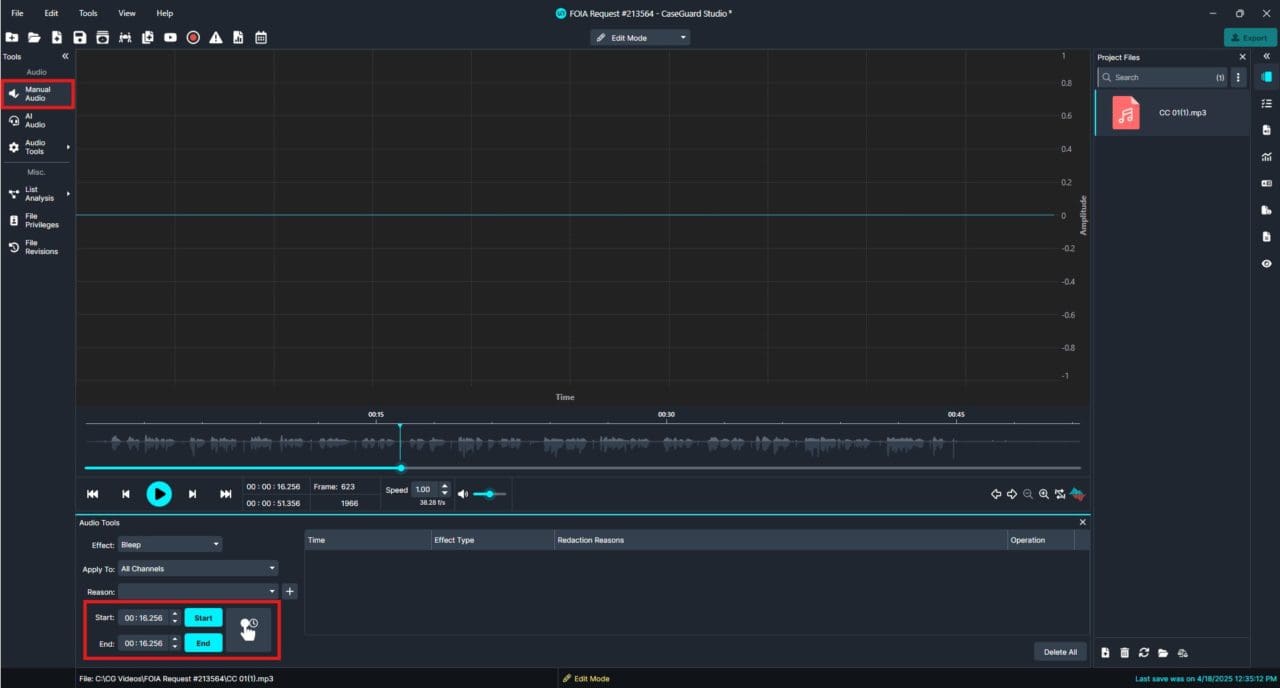
manual-audio-tools

There are four methods to apply audio redactions manually:

    • Enter Start and End times for the segment you want to redact, and then choose either Mute (Green) or Bleep (Orange).

  • audio-start-end-time
    • While the media is playing, click the Start icon and then the End icon to define the redaction segment. Once this is done, apply Mute, Bleep, or Change Voice.

  • audio-start-end-time-buttons
    • While the media is playing, click and hold the Press & Hold icon to capture a live segment, then apply Mute or Bleep.

  • audio-press-and-hold
    • Highlight the waveform directly to select the segment, then apply Mute or Bleep.

highlight-audio-wave

  • If your file contains multiple channels, you’ll see the ‘Apply to’ option.

    • Use ‘Apply to’ to choose which channel (Left, Right, etc.) the redaction applies to.

    • You can set this either before applying a redaction or afterward by selecting the existing redaction and adjusting the channel.

select-different-audio channels

  • Once applied to a single channel, the redaction will only cover half of the audio waveform, showing that it is isolated to one channel.

How to Apply Audio Redactions to Different Channels (Using Transcription)

The second method uses CaseGuard’s transcription feature to redact audio channels with precision:

  • Add your audio or video file to CaseGuard Studio.

  • Click the AI Audio tool from the left-hand Toolbar.

select-aiaudio-tool

  • Choose your transcription model:

    • Cloud Model (uses AWS servers)

    • Local Model (no internet required)

  • Select the language:

    • If known, select the language directly.

    • If unknown and only one language is present, choose Detect Language.

    • For multiple languages, choose Detect & Transcribe Multiple Languages.

  • Select the number of speakers.

  • Check the box for Transcribe Audio Channels Separately if your audio has more than one channel.

transcribe-audio-channels-seperate

  • Click Next, then Apply.

  • Once transcription loads:

    • You’ll see Left and Right channel icons at the top of the Transcription Panel—click between them to switch channels.

switch-transcript-channel

  • To redact specific words/phrases:
    • Highlight the word/phrase
    • Right-click, then choose Edit
  • Click on the Go to Position ( ) icon to jump directly to the point in the audio where a specific word is spoken.

  • Use the Search Bar within the Transcription Panel on the top right to find a word/phrase:

    • Press Enter to highlight all instances of the word/phrase.

    • Use the Mute, Bleep, or Change Voice icons at the top to redact all instances at once.

transcript-export-redaction

  • When you’ve completed your redactions, click Export from either the Task List Panel or the Shortcuts Bar to export your work.

By following these steps, you can easily redact specific audio channels in your files, ensuring your redactions are precise and compliant. For further assistance or questions, feel free to reach out to [email protected].