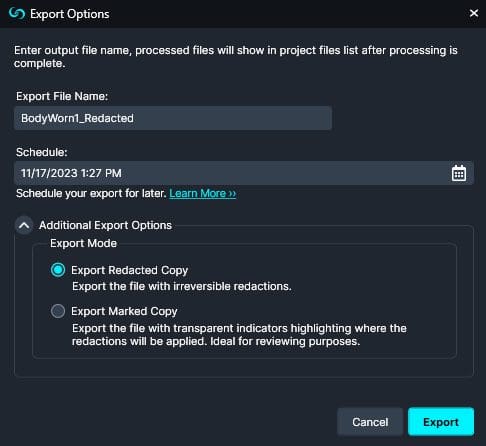
Once you’ve finished the redaction process in CaseGuard, you have the option to either export your redacted files immediately or schedule them for processing at a later time. Scheduling redactions for a future date can be particularly beneficial if you’re dealing with longer files that require extensive redactions. By setting an export time outside of your working hours, CaseGuard can run the export process while you’re away from your machine. This means when you return the next day, your fully redacted files will be ready and waiting on your machine, saving you time and optimizing your workflow.
Additionally, the software will process your files more quickly if they are local to the workstation. For advanced projects that require redacting multiple types of files (e.g., video recordings, audio recordings, etc) you can easily export them in one batch or as separate video or audio files.
For instance, imagine you have a project in CaseGuard with ten video files and seven audio files. Although you might eventually need to redact and process all of them, there could be one specific video that requires immediate attention. With CaseGuard, you have the flexibility to prioritize and process this urgent video quickly, addressing its specific needs in the short term. Then, you can continue working on the remaining files at your convenience, managing your workflow effectively according to the urgency and importance of each file. This feature allows for efficient task prioritization within your project.
Select files to redact
Now that your project setup is complete, you can dive into the actual redaction or enhancement work. Begin by selecting the file you wish to work on from the Project Files panel in CaseGuard. Next, choose the type of redaction you want to apply to this file. To familiarize yourself with the range of redaction and enhancement features available in Redaction Studio, you can refer to our comprehensive Beginners Guide to Redaction
You can also add video and audio effects in CaseGuard.
How to Export Files after Redaction?
- Review your redactions. Is it Ready to be Exported?
- Once you have reviewed your redaction, click
 “Export” from the top right of CaseGuard to process the file.
- The “Export Options” Window will pop up.
- Add an Export File Name.
- Optionally, select a time to Schedule your Export at a later time or immediately.
- Within Additional Export Options, “Export Redacted Copy” is auto-selected, which will export your file with irreversible redactions.
- Select “Export Marked Copy” to export a highlighted version instead of irreversible redactions. This is ideal for reviewing purposes.
- Click “Export”
- Once processed, the redacted file will appear in the Project Files Panel.
