Overview
AI Analysis provides an automated capability to identify and redact Personally Identifiable Information (PII) found in documents. This includes details such as names, addresses, phone numbers, Social Security numbers, and medical record numbers. This significantly reduces the time and effort required for manual PII removal in extensive documents featuring various PII categories.
To illustrate, performing AI Analysis on sensitive emails, where the imperative is to redact all names, email addresses, and phone numbers, can be accomplished within seconds. Furthermore, once this information is identified, it is straightforward to review the list of PII and choose to keep certain names and email addresses unredacted. The user-friendly and flexible navigation offered by the Analytics Panel has made it a dependable tool among CaseGuard users.
The main components of this feature include:
- Automatically redact all Personally Identifiable Information (PII) with one click
- Sort by one or more Categories of (PII) within the Analytics Panel
- Add Redactions Reason(s) per Category of PII
- Add a Color Per Category of PII (Ex: all Names in Blue, all addresses in Red)
CaseGuard supports AI document analysis in 53 languages, including Spanish, German, French, etc.
Follow the steps to Redact with AI Analysis!
- There are 3 ways to run AI Document on documents, the first is to click the AI Document
 button in the Toolbar, the second option is to open the Analytics Panel and click “AI Analysis“, or click
  at the bottom of the Analytics Panel.

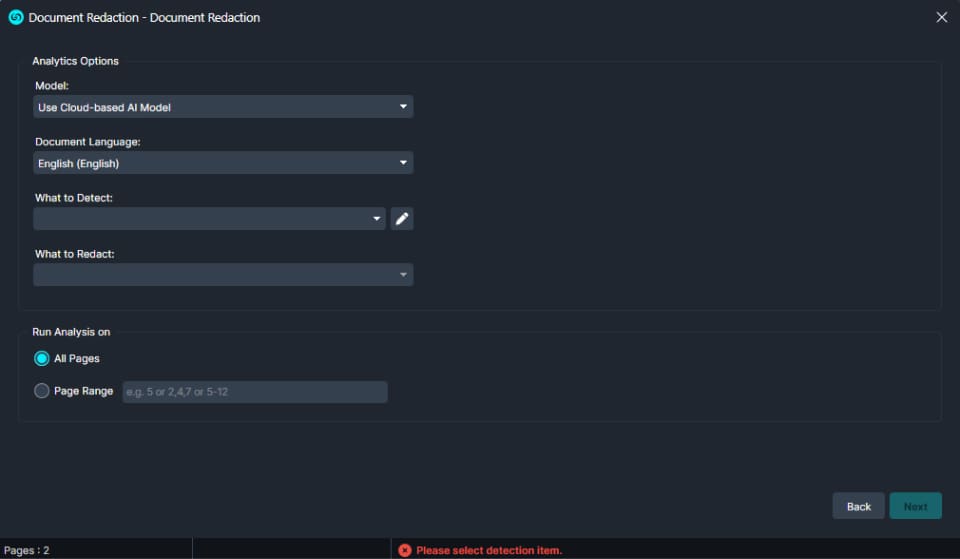
- Select which model you would like to run for your AI analysis. The options are the Cloud-based AI model and our local model which keeps you fully offline.
- Select the language of your file from the File Language dropdown.
- Under the “What to Detect:” dropdown, select what type(s) of PII you would like the AI to detect such as name, phone, address, etc.
- Use the Pencil Icon
 to assign a color and redaction reason for each Category of PII.
- Choose to either run the Analysis on all pages or a select range of pages that you can input in the text field.
- Click “Analyze.”

- The Analytics Panel will populate with all results. To search for a specific category, click the search bar, select “Type,” then select “Is Equal To” or “Is Not Equal To,” and then select one of the PII categories you asked the system to detect. This will filter out any other PII.
- The number inside the parathesis is the total number of entries found
- Select
 Redact all search results at the top of the Analytics Panel to redact all the detected items in your document or hover over each text and click
  Redact to redact them individually
- Select
 Highlight all search results at the top of the Analytics Panel to highlight all the detected text in your document.
- Select Remove Highlight to remove all the highlighted results.
- Select
 Go to position when hovering over each word to go to the position of that text in the document.
- Select
 Delete at the top of the Analytics Panel to remove all the detected items in your document or hover over each text and click
  to remove them individually. This is useful when you need to delete most PII found except a selected few.
- Select
 Increase/Decrease font size to zoom in and out within the Analytics panel.
- Select
 Find and Redact Lists to apply or create a Find and Redact List.
- Select
 Block when hovering over each item to block the word from being redacted in this file or future files.
- You can edit your blocked words by selecting
 Edit Blocked Analytics at the bottom of the Analytics panel.
- When you have reviewed the redactions, click
 Export from the Task List Panel or the export button from the Shortcuts Bar to export your redactions.
- Files processed will then be added to the Project Files panel on the upper-right corner of the screen.
Let’s see it in Action!
![Video Thumbnail]()
Play Video