CaseGuard can handle many file types (including proprietary files) for videos, audio, images, PDFs, email messages, documents, and more. If files cannot be properly added to CaseGuard, these tips will come in handy!
1. Check for File Corruption
Ensure the file is not corrupted before adding it to CaseGuard. Attempt to open the file using external players or software specific to the file type. For example, use Windows Media Player or VLC for video and audio files, Adobe Reader for PDFs, and Microsoft Excel for Excel files. A corrupt file may fail to open, have missing parts, or display errors.
2. Verify the Original File Location
If your file is not stored locally and resides on a shared drive or network, download it to your local computer first. Adding the local file to CaseGuard Studio reduces potential connectivity issues and ensures smoother processing.
3. Check Disk Space
Insufficient disk space on the drive where you use CaseGuard Studio may cause problems when adding large files to your project. Clear up space on the drive or consider changing the project’s location to a drive with more storage capacity.
Files exported from proprietary players may not be compatible with CaseGuard Studio. Re-export the file from the proprietary player to a standard file format like .mp4 or .avi to increase compatibility.
5. Update CaseGuard to the Latest Version
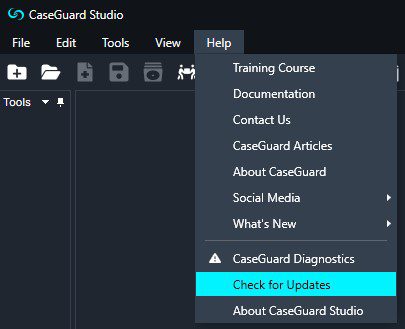
Ensure you are using the latest version of CaseGuard Studio to benefit from improvements and bug fixes. Click “Help” in the main menu to check for updates, then select “Check for updates.” If you need to update, follow the prompts or contact your IT department for assistance.

6. Adjust Extension Settings
Sometimes, you may need to add the file type extension to your Extension Settings to allow CaseGuard Studio to recognize the file. Click on “Tools,” then “Settings,”

Navigate to the “Extensions” tab. Add the specific extension to the associated file type and click “Save.”

7. Convert the File Type
If you encounter issues with a specific file type, consider using software like VLC to convert the file to a different format that is compatible with CaseGuard Studio.
8. Check Antivirus Software
Your antivirus software may be blocking essential components of CaseGuard Studio, hindering file uploads. Add CaseGuard Studio as an exception in your antivirus software, or contact your IT department for further assistance.
9. Use CaseGuard Recorder
As a last resort, if all other methods fail, you can use CaseGuard Recorder to record your video while it’s playing. CaseGuard Recorder creates a new recording you can upload to CaseGuard Studio. Access CaseGuard Recorder from the toolbar at the top of CaseGuard Studio.

10. Contact CaseGuard Support
If none of these methods fix your issue, please get in touch with [email protected].