Use Case
When I add my PST files to CaseGuard the PST import appears blank with no emails!
Follow these steps to add PST files to your CaseGuard!
The first step is to test to make sure the file has content or is not corrupt.
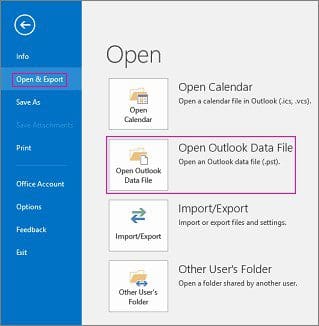
- Open Outlook and Select “File” > “Open & Export” > “Open Outlook Data File.”

- Select the PST file, and then select “Open.”
- Once you open the PST file, the file will appear in your folder pane with its file name.
Check and ensure all of the content of the PST file is there. If it is, close Outlook and use your task manager to ensure it is fully closed. Once Outlook closes, open up CaseGuard and add the PST file to ensure it is working correctly. The issue with the empty PST Import window is caused by the PST file being open in a different application when trying to add it to CasGuard.
- To add your PST file to CaseGuard first open or create a new project.

- Once you have a project open, click the “Add Files” icon from the top toolbar.

- The Windows file explorer will open, select the PST file you would like to add to CaseGuard and click “Open.”
- Once the file is added to CaseGuard the PST Import window will open. From this window select what emails you would to import from the file and click “Next.”

- The PST import settings will open. Select what settings you would like to apply to your PST file and then click “Import.”

Your file should now be imported into CaseGuard! If you are still having issues, make sure to close any application that may have this PST file open or is using it. If the problem persists, please connect with our support team at your scheduled time or schedule a meeting if you have not done so by sending your issue to [email protected].