How to Use the Automatic Translation Feature in CaseGuard
July 08, 2022 | 4 minutes read
As nations around the globe are more connected than at any other point in human history due to the rise of digital technology and communication methods, the process of translation is more relevant than ever. From a business that is looking to appeal to a new group of customers in a foreign country to a colleague that is looking to correspond with a coworker who has been assigned to work in a far-away jurisdiction, the applications of translation services in our current society are truly endless. With all this being said, CaseGuard Studio’s software gives users the ability to translate audio and video content into a multitude of different languages, giving clients the means to communicate with people all across the world.
Getting started


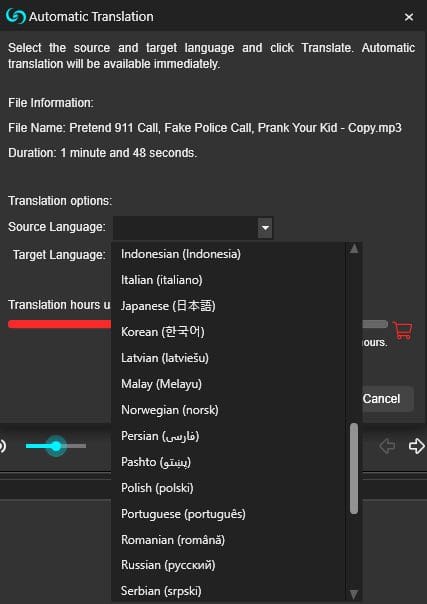
To initiate the automatic translation process within CaseGuard Studio, software users must first click on the Translation tab in the upper right-hand section of the software. After clicking on this tab, users can then click on the Pin icon in the upper right corner to pin this tab to their workspace. After pinning this tab to the workspace, users can then click the Automatic Translation button in the bottom left corner of the tab, which will then take users to the Automatic Translation pop-up window. When navigating this pop-up window, users will be prompted to select the Source Language for their audio or video file, as well as the Target Language they are translating.

For context, CaseGuard Studio’s software supports over 100 different languages from various countries which include but are not limited to Russian, Tamil, Spanish, Hindi, Serbian, Portuguese, Turkish, Urdu, Malay, Latvian, and Pashto. To this point, if users need to transcribe their file prior to translating it, they can also click on the Transcription tab in the right-hand section of the software, and then pin this tab to the Translation tab. As is the case with CaseGuard’s Translation feature, the Transcription feature is also compatible with the same 30-plus supported languages. Irrespective of whether a user decides to transcribe their file before translating the file, they can start the process by clicking the Translate button within the Automatic Translation pop-up screen.

Editing the translation


When the automatic translation process has been completed, users will be able to view the translated words in the Target Language they selected from the Automatic Translation pop-up screen in the Translation panel. Likewise, users can mouse over every sentence within the translation and click on the edit button to make changes to a particular translation. Clicking this button will then open the Edit Sentence pop-up window within the user’s workspace. Within this window, users can edit the Speaker who is talking during the translation, the Start Time and End Time where the sentence occurs, and most importantly, the specific words that were translated.

Translation captions


On the other hand, users can also add captions to their translated files by clicking on the Burn Captions to File button in the lower-right-hand corner of the Translation panel. This will then take users to the Closed Captioning Options pop-up screen. Within this screen, users can adjust the Size, Opacity, Font Color, and Background Color for the closed captions they want to insert within their file. Moreover, users can also decide where they want their captions to appear within their file by clicking on the drop-down Caption Position menu, as well as the Capitizlation of the words and sentences within their file by clicking on the other drop-down menu within the screen.
Finalizing the changes


Once a user is satisfied with the accuracy of their translated file, as well as any other pertinent changes they were looking to make, they can finalize the process by clicking the Export button in the upper right-hand section of the software. When the process has finished, users will be able to access their translated file by clicking on the thumbnail for the file within the Project Files panel, underneath the Export button. After clicking on the thumbnail for the translated file, users will then be able to play the file within CaseGuard Studio’s media player, giving them the opportunity to view the final product of their work.
Despite the fact that translation was once a painstaking and cumbersome process, developments in artificial intelligence and machine learning algorithms have made it possible to translate audio and video files into different languages in a matter of seconds in a manner that is both effective and efficient. On top of this, the functionality of CaseGuard Studio also gives users the ability to manually edit any words or sentences that have been translated within the software, giving users the assurance that they will be able to adequately correct any mistakes that may occur. In this way, CaseGuard Studio makes the process of automated translation accessible to everyone.