Overview
CaseGuard’s Merge feature combines up to 16 media files into one video for easier exporting, editing, or redacting. This feature is especially useful for merging multiple videos into one video of the same incident from different angles to ensure all Personally identifiable information is protected. Users can select from up to three templates to decide how their videos are displayed.
One use case for this feature would be if you have security footage from four different angles you need to combine it into one video to comply with a Freedom of Information Act request. Combining the four videos into one by using the Merge feature and performing redactions on one video instead of four will save time in redaction and export.
Additionally, users can add the audio file with closed captions of the 911 call with the footage of the incident in one split screen. Presenting the audio call alongside the crime scene is often praised by courts for enhancing transparency when introducing evidence.
Follow these steps to Merge Multiple Media Files!
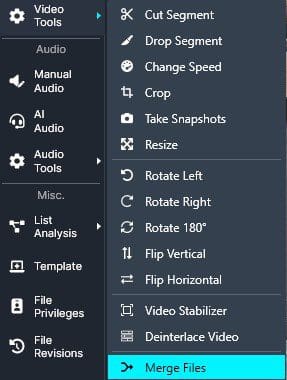
- Open a video file in CaseGuard and select “Video Tools” from the left toolbar.
- From the video tools drop down select “Merge Files.”
- You can also access Merge Files in all types of media by clicking the tools related to that file.

- The Merge Files Window will open, from the window select “Merge Media Files (Side by Side.)“

- Click “Next” and the Add Files window will open, select “Add Files” to add all the files you would like to merge.
- You can add up to 16 files.

- Click “Next” and the Select Template window will open.
- Select one of the templates to decide how you would like your videos arranged.

- Click “Next” and a preview of your merged files will appear.
- From the preview select the order of the files and which files will have audio.

- Once satisfied click “Next,” and the Add Additional Audio window will appear. From this window, you can add extra audio to your merged files.

- Click “Skip” if you did not add any audio, if you did select “Next.”
- The Merge Media Files Review window will appear, from here you can customize your project settings, and export settings.

- Once you are satisfied click “Apply” and files when begin merging. Once finished they will appear in the Project Files Panel!
Let’s see it in action!
![Video Thumbnail]()
Play Video