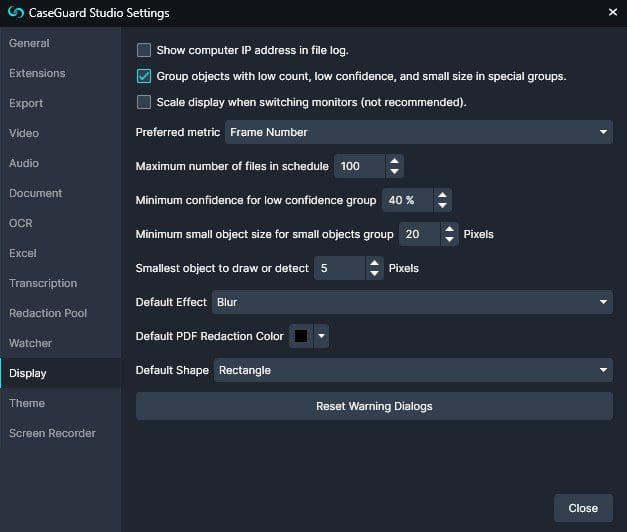
To access CaseGuard Studio’s Display Settings, select Tools –>Settings. The CaseGuard Studio Settings popup contains 14 tabs, one of which is the “Display” tab.
When navigating the display settings using CaseGuard Studio, there are several settings that you can configure to meet the particular needs of you or your agency.

Show computer IP address in file log
Select this option if you’d like the system to display your IP address in the File Log. Please note, that this will only remove the display of the IP Address, it will not remove its entry from a subsequent file report, or the audit trail.
Group objects with low count, low confidence, and small size in special groups
Select this option if you’d like the software to group low-count, low-confidence, and small-sized objects into special groups when running video detection using the software.
Scale Display when switching monitors
Check this box if you’d like the software to scale the application to which monitor you are using CaseGuard Studio.
Preferred metric
From within this drop-down menu, select your preferred metric for video redaction when using the software (Frame Number or Time).
Maximum number of files in the schedule
Use this box to decide the maximum number of files you’d like to hold within the CaseGuard Scheduled Tasks pop-up window at any given time.
Minimum confidence for low confidence group
Use this box to set the minimum level of confidence for low-confidence groups when running video detections within the software. For reference, this confidence level refers to the accuracy of the system in determining that an object is a face, vehicle, license plate, etc., on a scale ranging from 0% to 100%.
Minimum small object size for small object group
Use this box to determine the minimum number of pixels you’d like the software to categorize as small object groups when running video detection.
Smallest object to draw or detect _ Pixels
Use this option to change the minimum number of pixels that must be used when drawing redaction or enhancement boxes, as well as using the automatic detection feature.
Default Effect
Within this dropdown menu, you can choose one of the software’s 32 different redaction and enhancement effects to serve as the default effect whenever you begin a new redaction project (blur, pixelate, sharpen, contrast, etc..)
Default PDF Redaction Color
This dropdown menu allows you to select the default color you would like to use for document redaction.
Default Shape
This dropdown menu allows you to select the default shape you would like to document redactions.
Reset Warning Dialogs
This setting will enable all warning dialogs that were disabled by clicking the “Do not show this message again” checkbox.