Overview
CaseGuard Studio’s Manual Document feature gives you complete control when redacting sensitive information from any document file. You can conceal Personally Identifiable Information (PII), classified information, or other sensitive content with just a few clicks. It’s ideal for documents that don’t need many redactions or to perform manual edits after running AI text analysis.
With the Manual Document feature, users can easily identify and redact confidential information from documents as well as remove logos that appear throughout. The Manual Document feature allows you to repeat the redaction process on multiple pages with just a few clicks, ensuring that no sensitive information is left exposed.
The Manual Document tool enables you to:
- Redact both text and graphics anywhere in your document.
- Categorize your redactions using color coding.
- Assign redaction reasons to any redaction on the page, providing a record as to why the redaction was applied.
Follow the steps to Redact Manually!
- Right-click anywhere on your document and select Manual Redaction.
- To draw a redaction box, left-click, hold, and drag your mouse over a block of text, object, or area.
- To categorize your redactions, apply a color to your redaction box from the Tool Properties Panel at the bottom of the screen.
- As per your needs, assign redaction reasons to any of your redactions. CaseGuard Studio provides a pre-established collection of redaction reasons. Alternatively, you can create your own set of reasons by clicking (+) next to the Redaction Reason dropdown.
- It is recommended to first choose your redaction reason, then apply your color, and then start redacting! The selected redaction reason and color will automatically apply to all redactions drawn until you manually choose another reason or color.
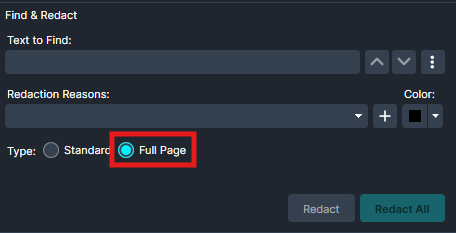
In addition to drawing boxes manually, CaseGuard makes it easy to redact entire pages at once in just a click.
To do this:
- Select “Full Page” in the Find & Redact panel at the bottom of the screen.

- Make a redaction box anywhere on the page you want redacted and CaseGuard Studio will automatically redact the entire page.
Once you’ve completed the redaction process, click  Export from the Shortcuts Bar to process the file.
Let’s see it in Action!
![Video Thumbnail]()
Play Video