Overview
In CaseGuard Studio, users can build a list of information they would like redacted from their document files. In some cases, you might not need to redact all names but instead, you have a list of names that you need redacted, or you want to redact something that follows a pattern such as phone numbers, email addresses, and SSNs. If you have specific Patterns you would like detected in your documents, you can reuse your list forever on any document.
Not only can users create their own lists, but they can edit, delete, rename, and duplicate lists.
Follow the steps to Create a List!
- Click Find and Redact Lists
 within the Analytics Panel.
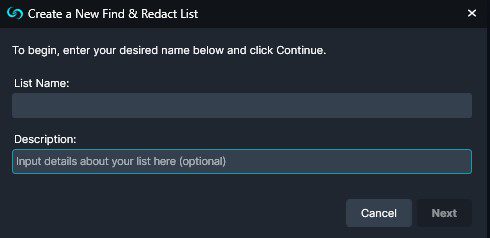
- Click “Add New List” and the “Create a New Find & Redact List” window will appear.

- Name your list (and optionally a description), then click “Next.”
- Select either the “Add Entries” or the “Import” operation to create your find & redact list.
- Selecting Import will open your file explorer and allow you to select a file to use for an entry. Make sure to have .txt or .csv files prepared if you choose Import.
- Selecting Add Entries will present a pop-up asking you to select between an Exact Word Match or a Pattern.


- Exact Word Match is the default selection and will allow users to input the exact words to search for throughout documents.
- Filter “Find & Redact” results by selecting the “Case Sensitive” and/or the “Whole Words Only” checkboxes.
- Click the “Type” dropdown and select a category of information to label the desired text when adding it to your list (i.e. Phrase, License Plate, etc.)
- Choose a color to associate with the entry by selecting one from the Color dropdown.
- Click the “Select a Reason” dropdown and choose one of the existing reasons or create your own reason by selecting Edit Redaction Reason
 .
.
- Click “Save & Add New” to immediately add another entry or click “Save & Close” once you are finished adding all your entries.

- To also add Patterns to your list, begin by clicking the Pattern option next to Exact Word Match.
- Click the “Select Pattern to Find & Redact” dropdown and select your desired pattern from the list such as email, phone number, and/or social security number, etc.
- Additionally, you can create a pattern by clicking the
 next to the “Select Pattern” dropdown and then clicking “Add New” on the screen that pops up.
- Once you have either selected a pattern or created a new one, you can change the color associated with this entry by clicking the color dropdown.
- If you have a reason for this redaction, click on the Select a reason dropdown to choose a pre-made reason or create a new reason.
- Click “Save & Add New” to add another entry or click “Save & Close” once you are done creating your list.
- Once an entry is added, users may click “Analyze” in the Find & Redact List window or in future files, click
 then “Use Existing List” in the Analytics panel to begin processing documents with the newly created list.
- Text results will populate in the Analytics panel based on the type of text found and redacted.
Let’s see it in Action!
![Video Thumbnail]()
Play Video