Overview
An S3 bucket, a fundamental component of Amazon Simple Storage Service (S3), serves as a versatile storage or container for an array of objects, housing files in different formats. Whether it’s images, videos, documents, or other data, an S3 bucket provides a scalable and secure solution for storing vast amounts of information.
In the context of redaction processes, the benefits of an S3 bucket are clear. For example, the automated redaction of a video using the Watcher within one S3 bucket results in the redacted version being transferred to another location instantly. This process saves the user hours’ worth of work by utilizing the Watcher’s automatic redaction paired with the convenience of an S3 bucket.
To connect CaseGuard Studio to your S3 Bucket, follow these steps:
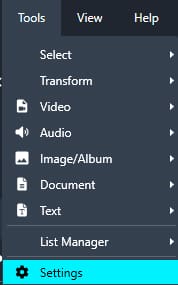
- Click “Tools” at the top Toolbar of CaseGuard Studio. A drop-down menu will pop-up.
- Then click “Settings.” The CaseGuard Studio Settings window will pop-up.

- Find the “Watcher” tab from the list of selections on the left.

- Select the checkbox for “Allow watcher to be linked with cloud” and then click “Close” to save the changes.
- Click on the “Watcher”
 icon from the Panels on the right-hand side of the screen.

- The Watcher panel will appear at the bottom right of CaseGuard.
- Click on the “Add Watcher” button or the “Add Folder to Watch”
 icon.
icon.
- A Watcher window will appear.

- The CaseGuard Watcher window will pop up.
- Enter a Watcher Name.
- Click “Browse” to add a local folder, located next to the “Folder to Watch” and “Output Folder” input fields.
- This is the folder where all files that need to be redacted will be input.
- Select the “Cloud”
 Icon to set up a cloud location for your Watcher.
- The cloud will automatically add the files to the local folder. Once they are added to the local folder they are deleted from the cloud.

- A “Establish connection to cloud storage window” will appear.
- Provide the AWS region (typically found on the top right of your AWS account) and the S3 bucket name.
- Input the Access Key ID and Secret Access Key. Reach out to your administration if you don’t have access to these keys.
- The Secret Access Key is fully encrypted and safe inside CaseGuard.
- Select “Verify Connection” and then click “Connect” once all fields are completed.
- Repeat these steps to add an Output folder from the S3 bucket or a local folder.
- The local folder will automatically move the output files to the cloud. The files will be deleted from the local folder after they are moved.
- This folder will contain all exported files after the Watcher processes and redacts the documents from the Watch folder.

- To save history files of your operations in your Output folder, select the “Keep history files for manual review” checkbox.
- Click the “Operation” dropdown and select what operation you would like the Watcher to perform.

- Click “Add” to select what you would like detected.
- Click “Save” when you have added everything.
- The S3 bucket is now connected to your “Folder to Watch” and “Output Folder” and your watcher is configured, you can now begin adding a folder to your S3 bucket for the watcher to redact.
By following these steps, you can easily connect CaseGuard Studio to your S3 Bucket and automate the redaction process using the Watcher feature.