Do you struggle with redacting multiple videos that depict the same event, just from different angles? To make matters worse, they don’t line up with each other, meaning CaseGuard’s Copy Effects feature wouldn’t be able to help. This would normally mean hours of work, going through and finding the same things to redact over and over. However, CaseGuard’s Merge feature makes this a simple process.
There are often times that CCTV or BWC footage has captured an event from multiple angles, creating a challenge when trying to ensure all videos are synchronized for seamless redaction. This misalignment can lead to tedious, repetitive tasks, eating up valuable time and resources. With CaseGuard’s Merge feature, you can effortlessly align these videos, making it easy to display all angles of the event while also having them all redacted. This innovative tool streamlines your workflow, allowing you to focus on more critical aspects of your casework.
Getting Started
To begin, we need to upload two videos to CaseGuard Studio that we plan to merge. In my case, I have two separate recordings from a Zoom call: one from the Zoom recording itself and one from the CCTV footage of the room where the call took place.
Once both videos are added to CaseGuard Studio, the first step is to determine which video is shorter. One of my files is one minute and 13 seconds long, while the other is 54 seconds. I will select the shorter video and watch it until I hear someone speak.
In the shorter video, the first words are “Sure, my name is…”. After identifying this point, I will pause the video and switch to the longer one in the Project Files Panel. I will then play the longer video until I hear the same words, pausing it at that moment.
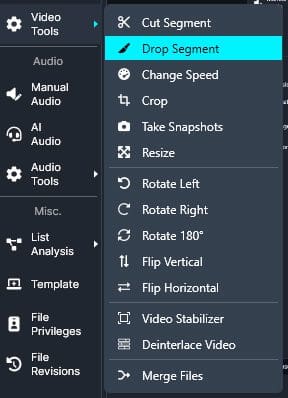
Now that I’ve identified where the two videos should merge, I’m going to click “Video Tools” in the Toolbar and then “Drop Segment” from the dropdown.

Drop Segment is a tool that automatically deletes a segment of the selected video that the user specifies.

I can now go to the End section of the Drop Segment tool and enter ’19’ in the seconds slot. Once I hit ‘Drop Segment,’ the dropped section of the footage should appear in the audio timeline in purple, indicating it has been successfully identified and is ready to be dropped.

Once I’ve done this, I can go ahead and click the Export  icon. This will generate our new video with the desired segment removed.
Merging the Files
Now that we have two videos of the same length, it’s time to merge them.
We can now click on “Video Tools” in the Toolbar once again, this time selecting “Merge Files” From the bottom of the dropdown. This will populate the Merge Files Window in CaseGuard Studio.
For our purposes, we want to select Merge Media Files (Side By Side).
In the next window, I’ll click “Add Files” and select my two videos that are now the same length. On the next page, I’ll select “Vertical Stack” for my template since both of my videos are horizontal.
Once I reach the end of the merge settings, all I have to do is click “Apply” and CaseGuard will do the rest for me. After just a few moments, I now have a split-screen video with fully synced audio.

Redaction
Now that I have my videos lined up and merged, It’s time to redact them. I need faces, names, and addresses all masked from the two videos.
- To start, we’ll select AI Video from the toolbar.
- From the “What to Redact” window, I’ll select “Faces/Heads,” then selecting Ellipse and Adaptive Blur for my effects in the next window.
- In the Advanced Video Options Window, I’ll select the Classify Objects option to make the editing and review process easier. Then “Next” and then “Apply.”
This will start the AI Video Redaction Process. In our Object Detection Panel, we should now be able to see the faces in our video start to populate. From here, we are able to easily turn masking on or off.

While this is happening, we can go ahead and redact the audio in our video.
- To start, I’ll click “AI Audio” in the Toolbar.
- Once the AI Audio Window comes up, I’ll select English for the language and 2 for the number of speakers.
- Click Transcribe.
- Now the Transcription Panel is pinned. Once our audio is done being transcribed, we can click Analytics at the bottom of the window, opening the Analytics Panel.
- From here, I can click the Mute All
 icon to automatically remove all PII from my audio
Now that we have a split-screen video that has been redacted of all PII in both the audio and video, we can go ahead and click the Export  icon. Now, my file is saved to my computer and fully redacted.