Overview
Watermarking is a technique used to display a marked text or image on top of documents for reasons of security and authenticity of work. Additionally, it is useful for protecting confidential information, as well as displaying ownership. Using CaseGuard, you can apply custom watermarks to documents that are difficult to alter, which will help protect them from being stolen or used without permission.
The Watermark feature in CaseGuard Studio is valuable for organizations that need to personalize their redaction reports. Applying your company logo on legal documents or even reports created by CaseGuard can impact the credibility of your work significantly. Adding your logo once within CaseGuard can be used repeatedly on any document without any manual work!
Additionally, users can add a text Watermark such as a red “Confidential” watermark to thousands of pages of legal documents, as well as import files with a list of watermarks to be added to one document.
Follow the Steps to Add a Watermark
- Click the Watermark
 button in the left toolbar and select “Add New Watermark.”
- Enter a name and short description for the Watermark and click “Continue.”
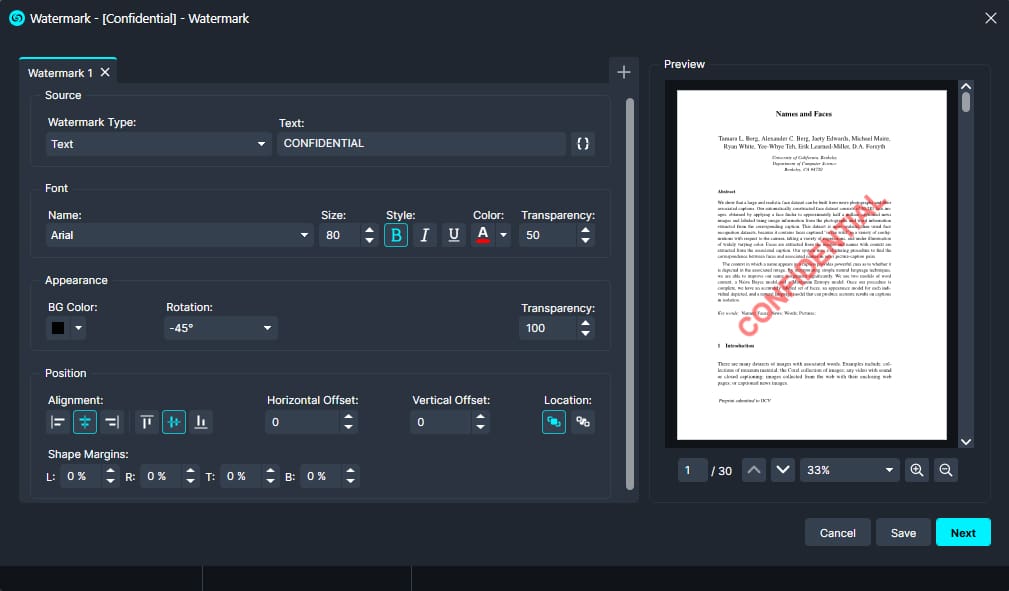
- Select the Watermark settings you want to add to your file.
- Select the Watermark type: Text, Image, or Dynamic Text
- Text: Create your own Text Watermark
- Image: Upload an Image
- Dynamic text: Import a .csv file to reference a column of data to be used as Watermarks. For example, if you input file A with a column of company names, CaseGuard will export document B multiple times with different Watermarks (Company Names) from the columns in File A.
- Based on the type, enter the text or image you would like to apply as your Watermark. For Dynamic Text, the input file will be added in the next steps.
- Customize Watermark: select the Font, Font Size, Color, and Transparency of the Watermark.
- Adjust overall Appearance: select the background color, Transparency, Rotation, Degree, and Scale of the Watermark.
- Alter the position of the watermark: Select an alignment, vertical and horizontal distances of the Watermnark location within the Page.
- Add bate stamping and dynamic tags.
- Bates numbering is a method of sequentially numbering pages with a reference number.
- Dynamic tags add a watermark that follows a pattern you specify. In CaseGuard you can add a tag that adds today’s date, the email, name, username, or agency linked to your CaseGuard account.
- Optionally, layer Watermarks by clicking
 Add Watermark.
- Preview your results by zooming into your watermark using the tools under Preview Image
- Click “Next.”

- Apply Watermark to All Pages or Selected Pages. This window appears differently based on the type of Watermark Selected.
- Input File under the “Input File Name” field for Dynamic Text Watermark. This field will not appear if Dynamic Text is not selected.

- Click “Apply,” and your Watermark will be applied to your document. For Dynamic Text, map the column from your “Input File” to be used as Watermarks.
- Watermarked Files will be added to the projects file panel.
Manage your Watermarks
- Click
 Watermark in the left Toolbar and then select Manage Watermarks. The Manage Watermark Templates window will populate.

Within the Window:
-
- Add a new Watermark.
- Search for saved watermarks using the search bar at the top. The number in the Search bar indicates the total number of Watermarks saved in your CaseGuard Studio License.
- Click
 Edit under the operations to revise existing Watermarks.
- Click
 Duplicate to reproduce the same Watermark.
- Click Delete
 to remove a Watermark.
- Note: You will not be able to undo this action.
Apply a Watermark
- Click
 Watermark in the left Toolbar and then select Apply Existing Watermark. A popup will appear.
- Use an Existing Watermark to apply to your document. Choose the Watermark within the “Template Name” dropdown.
- Click “Continue”
- Customize the Watermark.
- Click “Apply.” The Watermark will begin applying to your document
- Once processed, the Watermarked document(s) will appear in the project files panel.
Let’s see it in Action!
![Video Thumbnail]()
Play Video