Use Case
The requestor of the file I am working on is asking for me to supply a list of redaction reasons for all the files I have worked on, how do I add redaction reasons on the file level? In this article, we will cover how to add redaction reasons to every file inside your CaseGuard project.
Follow these steps!
First, we will cover how to add the redaction reasons to your files if you have not created a project yet.
- Once you open CaseGuard you will be greeted with a Get Started window. From this window, select New Project.
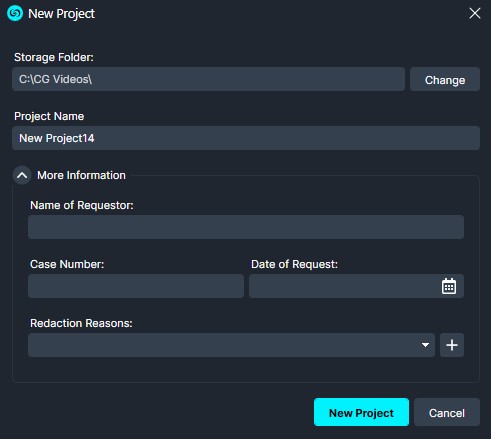
- The New Project window will open, from this window select the More Information drop-down.

- Inside the more information window, you can add any needed information about your project.
- To add redaction reasons to your files select the Redaction Reasons drop-down at the bottom. With this field, you can select as many reasons as needed.
- By selecting the plus icon beside the drop-down, you can customize and add any reasons needed. To learn more about redaction reasons, see this article.

- Once you have selected all your Redaction Reasons, select the New Project option.
- Now any files added to your project will have the selected Redaction Reasons applied to them.
- If you need to edit the redactions reasons applied to your file, select the File Privileges on the left side of your CaseGuard.

- Once selected, the File Privileges window will open. From this window, you can add or remove any needed Redaction Reasons!
Now that all of your Redaction Reasons have been added let’s learn how to export our Privilege log!

- Once selected, the Print Report window will open.
- Select the Report drop-down at the top of the window, from the Report drop-down, select Privilege log.

- Now the Report window will change to the Privilege log report. From here, you’ll be able to see all of the files in your project as well as the select Redaction Reasons.
- To export or print this report, select the Export drop-down or the print icon.

You now know how to easily supply a list of Redaction Reasons for any file inside of CaseGuard! If you have any questions or need further assistance, please don’t hesitate to contact us at [email protected]. Our support team is ready to help.
Was this article helpful to you?
No
Yes