Overview
Optical Character Recognition (OCR) converts scanned or handwritten documents into searchable, machine-readable text. Running OCR is an essential step before redacting scanned PDFs because it enables CaseGuard Studio to recognize text accurately for search, AI-assisted detection, and automated redaction.
CaseGuard Studio allows you to:
- Run OCR manually on individual documents or selected pages.
- Automatically OCR every new PDF added to a project.
This guide explains both methods.
When Should You Run OCR?
You should run OCR whenever your document is not machine readable.
Common scenarios include:
- Scanned PDFs
- Handwritten documents
- Image-based PDFs
- Documents where selecting text highlights random words or characters
- Files with poor OCR quality
- Documents you plan to redact using AI or automated text detection
Running OCR improves:
- Search accuracy
- AI-assisted document redaction
- Text selection
- Pattern detection
- Overall document processing
Method 1: OCR a Document Manually
Use this option when you only need to OCR a specific document or selected pages.
Step 1
Open your document in CaseGuard Studio.
Step 2
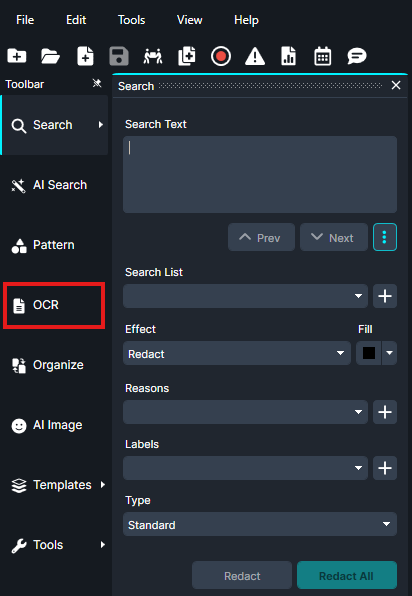
Select OCR from the left toolbar.
Step 3
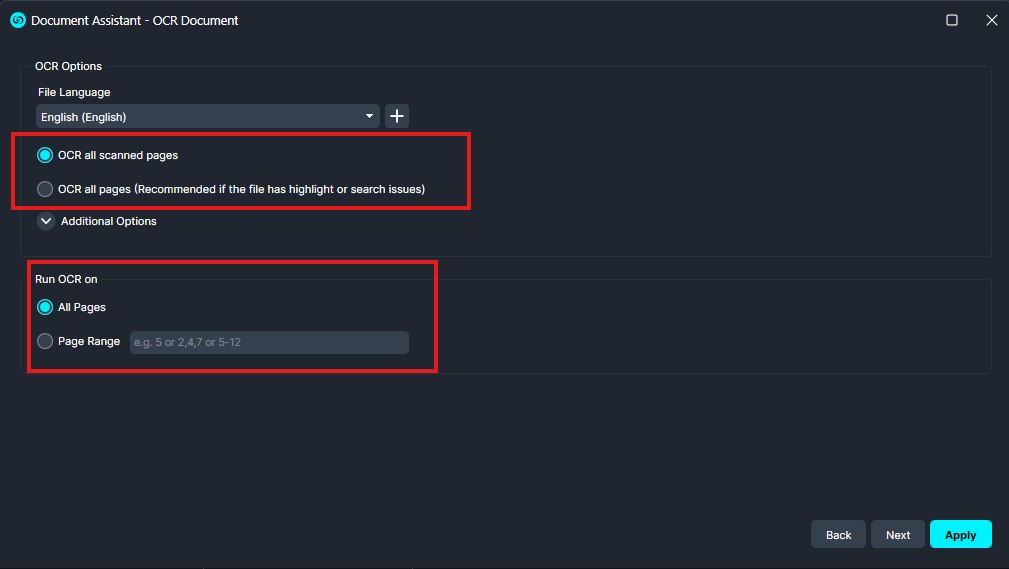
- Choose the document language.
- Select one of the following:
- OCR All Scanned Pages – Only scanned pages are processed.
- OCR All Pages – Every page is processed, including machine-readable pages.
- Under Run OCR On, choose either:
- Then click Apply.
The document is now searchable and ready for redaction.
Method 2: Automatically OCR Every New PDF
If your organization regularly works with scanned or handwritten documents, you can configure CaseGuard Studio to OCR every PDF automatically when it is added.
Step 1
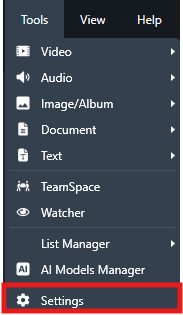
Go to:
Tools > Settings
Step 2
Select OCR.
Step 3
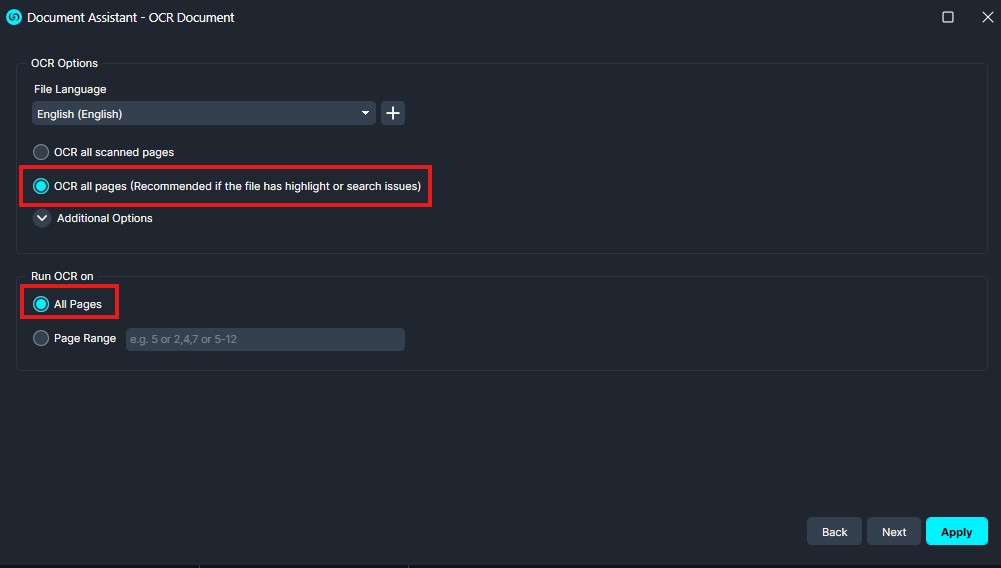
Choose your default OCR behavior.
You can select either:
- OCR All Pages – Recommended if your documents frequently have search or text selection issues.
- OCR All Scanned Pages – Recommended if only scanned documents require OCR.
Step 4
Enable Automatically OCR New PDF Files
- This ensures every PDF imported into CaseGuard Studio is automatically processed using your selected OCR settings.
Step 5
Close the Settings window.
Future PDF files added to CaseGuard Studio will now be OCRed automatically.
Which Option Should I Choose?
| If you want to… |
Use |
| OCR one document |
Manual OCR |
| OCR specific pages |
Manual OCR |
| OCR every imported PDF |
Automatic OCR |
| Work mostly with scanned evidence |
Automatic OCR |
| Improve search on one file |
Manual OCR |
Benefits of OCR
OCR provides several advantages when working with documents in CaseGuard Studio.
- Makes scanned documents searchable
- Improves text selection
- Increases AI redaction accuracy
- Enables automated document analysis
- Improves PII detection
- Speeds up document review
- Creates consistent document workflows
Conclusion
OCR is a critical step when working with scanned, handwritten, or image-based PDFs in CaseGuard Studio. Whether you choose to run OCR manually on individual documents or configure the application to automatically OCR every imported PDF, converting documents into machine-readable text improves searchability, AI-assisted redaction, and overall document processing.
For organizations that regularly work with scanned records, enabling automatic OCR can save time and ensure every document is ready for review and redaction as soon as it is imported.
Was this article helpful to you?
No
Yes