Use Case
After exporting your redacted video, it’s essential to ensure accuracy by comparing it with the original file. This step helps verify that no information was over-redacted or missed during the process. Thankfully, CaseGuard provides a simple way to compare different versions of your files within the same project.
Follow the steps below to compare your redacted video with the original in CaseGuard.
Follow these steps to
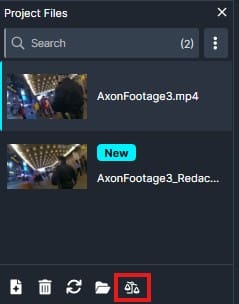
- Once your video has finished exporting, locate the Project Files panel on the right side of the CaseGuard Studio.
- At the bottom of the Project Files panel, click on the Compare Icon.

- This will open the Compare window, allowing you to set up the files you want to compare.
In the Compare window:
- Click on Select File to Compare to choose the files you want to compare.
- The Add Files window will appear. From here, select the first file (e.g., your original video) and click Add.
- Repeat the process by selecting Select File to Compare again to choose the second file (e.g., your redacted video).

- Once both files are selected, the Compare window will display your chosen files side by side. You can now view and play the videos simultaneously to compare them in detail.
- By default, the playback controls for both videos are synchronized. This means you can play, pause, and scrub through both videos at the same time for easy comparison.
- If you prefer independent controls for each video, select the Separate Controls option in the Compare window. This allows you to manage each video individually for a more tailored review experience.
With both videos loaded, carefully review the redacted version against the original to ensure accuracy. Pay close attention to any areas where redactions were applied or might have been missed.
By following these steps, you can efficiently compare any two files within your CaseGuard project. This functionality ensures confidence in your redaction work and maintains the quality of your outputs.
If you have any questions or encounter issues during the comparison process, please reach out to our support team. Contact us at [email protected], and we’ll be happy to assist you.
Was this article helpful to you?
No
Yes