CaseGuard Workspace

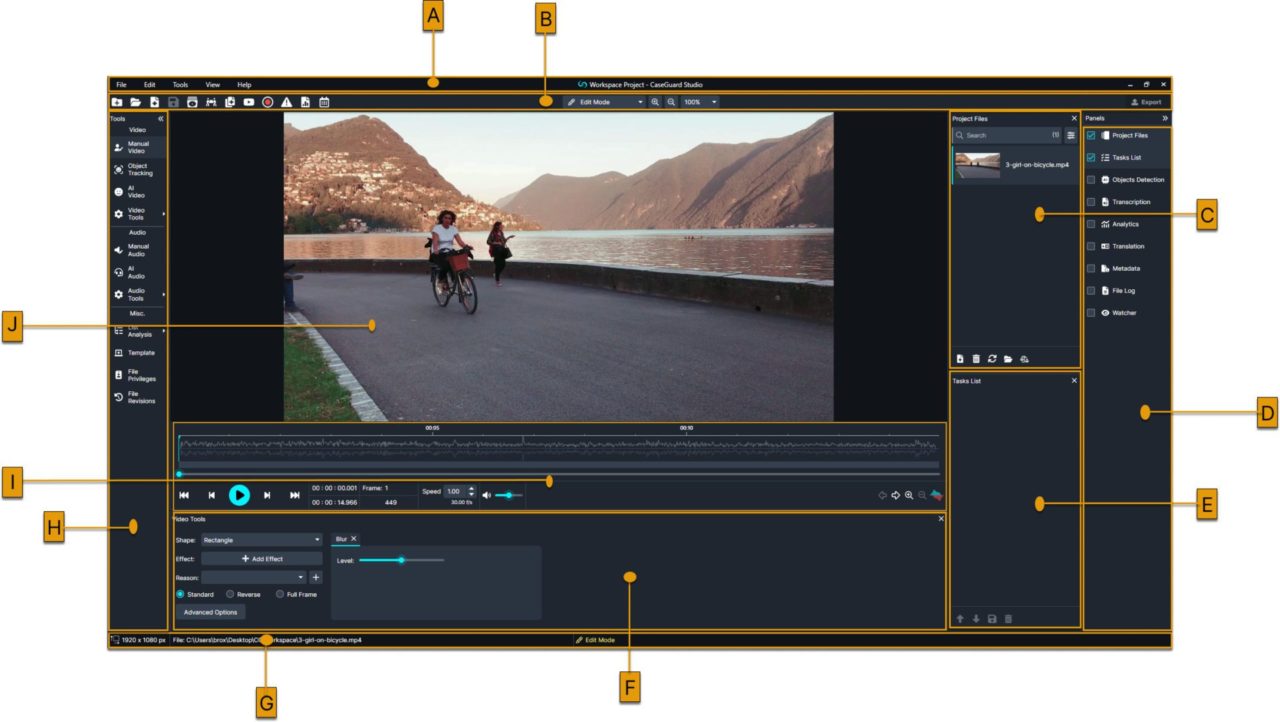
Take a look at the graphic below to gain a better understanding of the main areas within CaseGuard’s Workspace: These areas include the Menu Bar, the Shortcuts Bar, the Project Files Panel, the Task List, Additional Panels, the Tool Properties Panel, the Status Bar, the Tool Bar, and the Workspace Viewer. CaseGuard InterfaceA: Menu Bar | B: Shortcuts Bar | C: Project Files | D: Task List | E: Additional Panels | F: Tool Properties | G: Status Bar | H: Toolbar | I: Workspace Viewer

A: Menu Bar

CaseGuard’s Menu Bar contains standard File, Edit, View, and Help menus, as well as a specific menu for Tools. To access CaseGuard Studio’s Settings, select Tools –>Settings.

B: Shortcuts Bar

CaseGuard’s Shortcut Bar helps you choose commands, perform key tasks, and check the status of your files. For example, you can click on the Save button to save all of the work you have done within your redaction or enhancement project thus far. Alternatively, you can also click on the Add Files button to add additional files to your redaction or enhancement project.

C: Project Files

In CaseGuard Studio, your media will always appear as file icons, which link to the media files on your Window machine or storage device. You can reorganize your icons by renaming and moving files within the Project Files Panel. When using the software, a Project is defined as the original evidentiary file, and the “child” files you are placing redaction and enhancement work on. A child file is an individual file (e.g. a video file, audio recording, PDF, or image) that you’ve placed in a project. There can be multiple child files in any given project.

D: Task List

The Task List will show you the enhancement and redaction work that has been applied to your files, as well as the tasks you need to process. For example, if you decide to mute a portion of an audio file you are working on within the software, you will see a message within the Task List that reads Redact Audio.

E: Additional Panels

Tool Panels in CaseGuard Studio can be resized and rearranged. To change the layout of your panels, simply click the icon in the top right corner of the panel. For example, the File Log panel will provide you with various details regarding the files you upload when using the software, such as the time in which a file was added, the user who added the file, and whether or not the file has been added successfully.

F: Tool Properties

The Tool Properties Panel shows you a list of tools you can use to edit your media files. Depending on your file, the Tool Properties Panel changes based on the type of tool you select in the left-hand column, expanding to show you a list of all the tools available within the given toolset you are accessing at the moment.

G: Status Bar

The Status Bar tells you how much time CaseGuard Studio will need to process the last user action (e.g., detecting objects, processing enhancements, etc.) The progress indicator gives you an estimate of how long you will need to wait for the software to finish this action i.e. how much longer the system needs to finish detecting license plates, personal information, faces, etc.

H: Tool Bar

The Tool Bar is where you can select what toolset you want to use to begin enhancing and redacting content. For instance, you can select the Automatic face/head detection tool to begin the automatic face redaction process, while you can click the Audio Redaction tool to redact the audio from an audio recording or video.

I: Workspace Viewer

The Workspace Viewer is the area within the software where you’ll view your video clips and other types of media. When using the workspace viewer, you can play, fast forward, or rewind your videos, make edits to your PDF documents, add audio redaction effects to your audio files, etc.
Was this article helpful to you? Yes 1 No