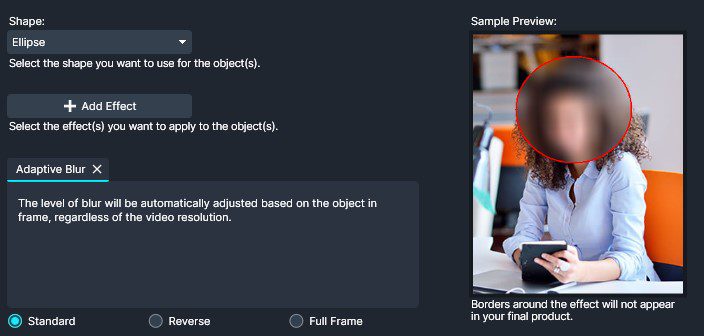
In CaseGuard Studio, you can choose from 30+ enhancement effects that can aid in concealing or clearer objects within a Video. Each effect has an intuitive slider that gives users full control over the intensity of the effect being applied. A higher intensity of blur is needed for objects closer to the camera, while a higher intensity of the magnifying effect may be used for objects further away from the camera.
Each Licence comes with all the different Enhancement Effects which can be stacked on top of each other to better hide or visualize an object within a video. For example, Investigators use CaseGuard’s enhancement effects to sharpen and magnify blurry or dark videos which have helped in solving crimes!
Shapes
CaseGuard has 5 different shapes available for redactions.
- Rectangle
- Triangle
- Ellipse
- Diamond
- Polygon
Select the shape you would like to use for your redaction from the Tool Properties Panel.

Effects Overview
CaseGuard has 31 different effects to use for redactions.
Adaptive Blur
Applies a varying degree of blurriness to different parts of the image, based on the local contrast, resulting in a smoother appearance.

Blur
Softens the image by reducing sharpness, often used to obscure details or reduce noise.

Pixelate
Converts portions of the image into larger pixel blocks, effectively obscuring details.

Filled
Fills selected areas with a solid color, concealing the original content.

Adaptive Equalizer
Enhances contrast and detail in specific regions of the image for a more balanced appearance.

Add Color
Introduces color to specific areas, useful for highlighting or adding emphasis.

Auto Brightness
Brightens any subject within the redaction area.

Border
Adds a border around the selected region, separating it from the rest of the content.

Canny
Detects edges in the image, creating an outline-like effect.

Color Correction
Adjusts the overall color balance of the image to improve visual quality.

Color Equalizer
Balances colors within the image, enhancing overall color distribution.

Contrast
Adjusts the difference between light and dark areas, enhancing visual definition.

Denoise
Reduces noise and graininess in the image, resulting in a smoother appearance.

Dilate
Expands the selected area, often used to make objects bolder or more prominent.

Edge
Enhances the edges of objects, making them more distinct.

Emboss
Adds a three-dimensional appearance by emphasizing raised and recessed areas.

Enhance Details
Increases clarity and sharpness of image details.

Erode
Shrinks the selected area, often used to refine object shapes.

Flip Horizontally
Flips the image horizontally along its vertical axis.

Flip Vertically
Flips the image vertically along its horizontal axis.

Gaussian Blur
Applies a specific type of blur that creates a soft, smooth appearance.

Gray Scale
Converts the image to grayscale, removing color information.

Inpaint
Fills in selected areas with content that matches the surrounding region, effectively removing unwanted elements.

Invert Colors
Reverses the color values in the image.

Light
Increases light on subject inside the redaction area.

Magnify
Enlarges a specific area of the image for closer inspection.

Median Blur
Applies blur by calculating the median value of pixels, reducing noise and preserving edges.

Rotate
Rotates the image by a specified angle.

Remaining Color
Removes all colors except for a specific color range.

Sepia
Applies a sepia-tone effect to any object within the redaction area.

Sharpen
Increases the contrast at the edges of objects, enhancing overall image sharpness.

Smart Magnifier
Enlarges selected areas while maintaining clarity and detail.

Subtract Color
Removes a specific color range from the image.

Text
Adds text to the image, useful for annotations or watermarks.

Watermark
Overlays the image with a transparent watermark, often used for branding or copyright protection.
