How to Add a Watermark to a Video in CaseGuard
June 29, 2022 | 4 minutes read
While adding watermarks to photos, designs, and documents has been a common practice for content creators for many years, the rise of video streaming platforms such as YouTube in the past decade has led many creators to turn their focus on producing video content. With this being said, watermarks within videos can serve the same purpose as watermarks that are placed within other forms of creative content, as these watermarks can increase the brand recognition of a particular company or business, as well as ensure that these organizations have the means to prevent the theft of their products and services. To this point, CaseGuard Studio contains a watermark visual effect that enables users of the software to place watermarks in video content with relative ease.
Getting started


To add a watermark to a video recording in CaseGuard Studio, users must first click on the Manual Detection tool within the lefthand toolbar. This will then open the Manual Detection panel at the bottom of the workstation. Within this panel, users of the software can both redact and enhance video content using a wide range of shapes, as well as visual effects. More specifically, the software contains four distinct shapes that can be used to redact and enhance video footage, which includes the rectangle, triangle, ellipse, and diamond shapes. Alternatively, there are a multitude of visual effects that can be inserted into these shapes when using the software.
Watermark effect

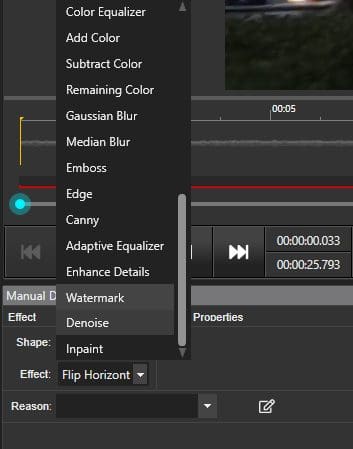
One of these visual effects includes the Watermark effect, which gives users the ability to upload a pattern, photo, or image that can effectively serve as a video watermark. To do this, users must first select the Watermark option from the drop-down menu located in the Effect section of the Manual Detection panel, as shown in the screenshot above. After choosing this visual effect within the Manual Detection panel, users will then be able to upload an image of their choosing to the software by clicking on the Change button within the Effect Properties section of the panel.

As seen in the screenshot above, an image of various bank notes and currencies has been inserted into the rectangle shape and can now be used to add a watermark to the video. To this end, users can choose to have their watermark appear within a portion of the video, or the entire duration of the video by right-clicking on the Manual Detection box and then selecting the Copy Effect To option from the dropdown menu. Selecting this option will then open the Copy Effect pop-up window within the software. From within this pop-up window, users can choose the frames within the video in which they would like the visual Watermark effect to appear.

To illustrate this point further, users can select the Whole File option to apply the visual Watermark effect to the video for the entire duration of said video. Conversely, users can also use the Selected Range option to implement the visual effect within a specific portion of a video recording, in accordance with the frames or timestamps within the said recording. For instance, a content creator may only want a watermark to appear for the first 15 seconds of their video recording. When a user determines the manner in which a visual effect should be implemented with the video they are editing, they can click the Apply button to finalize the changes.


Exporting the video

After applying the Watermark Effect within the redaction shape of a user’s choosing, the video can then be exported by clicking the Export button in the upper right corner of the system. This will then take software users to the Save As File Name pop-up window, allowing them to Export the video immediately by clicking on the Export button, or at a future date by selecting a day and time from the drop-down menu within the Schedule section. Once the video export process has been completed, users will be able to view their exported video under the original file they uploaded to the software. After clicking on this file, they will be able to watch the exported video within the media player in CaseGuard Studio.
Placing a watermark within a video recording is one of the main ways that businesses and creatives can safeguard their content from theft. Likewise, the Watermark visual effect within CaseGuard Studio gives users of the software a great level of flexibility as it pertains to the manner in which they want watermarks to appear in their video content. No matter the image, words, or graphic that a business or creative uses to watermark their content, these forms of media can easily be uploaded to CaseGuard Studio and used as a video watermark by following a few simple steps.