How to Add a Watermark to a PDF in CaseGuard Studio
June 28, 2022 | 4 minutes read
Placing a watermark within a photo, image, or document is one of the primary ways in which individuals and businesses alike can protect themselves against copyright infringement and forgery. While watermarks have traditionally been applied to physical items such as currency, government documents, or books, there are many software programs that now allow consumers to apply the same techniques to digital media. With all this being said, CaseGuard Studio offers users of the software the ability to add watermarks to PDF documents in a seamless and effortless manner.
Getting started
After a user has uploaded their PDF document to the software, they can begin the process of placing a watermark within the said document by clicking on the Pages tab in the right-hand corner of the workstation. After clicking on the Pages tab, users can pin this tab to their workstation by clicking on the Pin icon in the upper right corner of the tab. As the name suggests, the Pages tab within CaseGuard Studio gives users another way to visualize the individual pages that make up their PDF documents. As shown in the screenshot above, both pages within this PDF document can be viewed individually when navigating through the Pages tab.
Adding watermarks


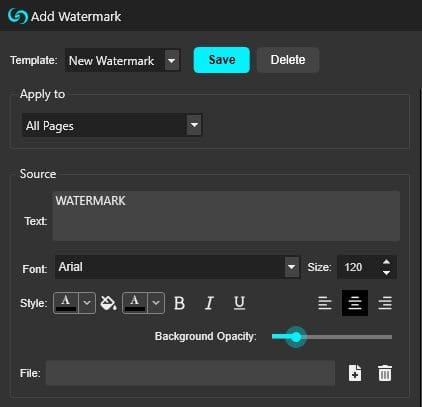
On top of this, users of the software can also add a watermark to both of these pages simultaneously by clicking the Add Watermark button at the bottom of the Pages tab. Clicking on this button will then open the Add Watermark pop-up window within the software. Within this window, users of the software can customize their watermarks to their individual liking. First and foremost, users can add a written watermark within their PDF documents by adding words or phrases to the Text section of the Add Watermark pop-up window, as shown in the screenshot above. Users will also be able to see the way in which the watermark will appear at the end of the process by looking at the Preview Page within the right-hand section of the pop-up window.

What’s more, users of CaseGuard Studio can also upload images to their PDF files that can also serve as watermarks. To do this, users can click on the Add Files button within the Add Watermark pop-up window, which will then take them to the file explorer on their local machines. When a user determines which image they would like to use as a watermark within their document, they will be able to see a preview of the image within the Preview window, just as is the case with the Text Watermark feature. In the screenshot above, an image of a Euro banknote has been placed within the document, which users can view under the Preview section of the Add Watermark pop-up window.

Moreover, users can also adjust the manner in which their watermarks appear within their PDF documents by making adjustments to the settings in the Add Watermark pop-up window. To this point, users can change the opacity of their watermarks within the Appearance section of the Add Watermarks pop-up window, as well as the location on the pages of PDF on which the watermark will appear. Users can also adjust the placement of the watermark effect in their PDF documents even further by changing the settings within the Position section of the Add Watermark pop-up window, as the Vertical Distance and Horizontal Distance settings can also be configured to change the appearance of the watermark on the final product.
The export process


When a user has decided the type of watermark that they wish to use within their PDF document, as well as the manner in which this watermark will be placed within the said document, they can finalize the changes by clicking the Export button in the upper right-hand corner of the software. Clicking on this button will then take users to the Save as File Name pop-up window, which will enable them to initiate the process by clicking on the Export button. Once the process has been completed, users will be able to their watermarked files within the Project Files Panel, as shown in the screenshot above.
As the falsification of documents only continues to grow amidst our current digital age, people must take additional steps to ensure that the documents that create are increasingly more difficult to counterfeit. Likewise, the PDF Watermark feature within CaseGuard Studio provides people with another means by which to assure that their digital signatures or documents can be easily validated should another individual try to copy said documents for nefarious purposes. By following the steps outlined in this article, users will be able to place effective Watermarks within their documents in a matter of seconds.