How to Crop Videos Using CaseGuard Studio
June 27, 2022 | 3 minutes read
When recording and editing video content, cropping is a process that can be used to achieve a number of desired effects. For example, a content creator may look to crop a video in order to remove any portions that may be distracting to the viewer. Alternatively, a business professional may need to crop a video to ensure that the video can fit certain dimensions within the company’s website. With all this in mind, the Crop tool within CaseGuard Studio gives users of the software the ability to make alterations to video recordings and content. What’s more, users can make these changes to their videos by following a few simple steps.
Getting started


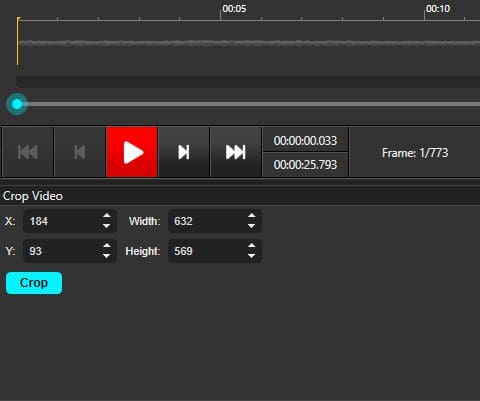
To begin the video cropping process in CaseGuard Studio, users will first need to click on the Crop tool within the left-hand toolbar. Clicking on this tool will then open the Crop Video panel in the lower-left hand corner of the workstation, as shown in the screenshot above. Within this panel, there are a multitude of ways in which users can crop their videos. First and foremost, users can use the crop tool to draw a box over the specific portions of their video content that they want to crop. This can be done by left-clicking on the video within the media player and then using the mouse to drag a box over a section of the video.

On the other hand, users of CaseGuard Studio can also crop their videos by using the X and Y values within the Crop Video panel. After entering numbers into the X and Y values, users can then click on the Crop button within the Crop Video panel to apply the changes to the video. Furthermore, these changes will also be reflected on the Tasks List panel in the right-hand corner of the software. On top of this, users of CaseGuard Studio can also crop videos in accordance with the Width and Height of the recording, as these values are also present within the Crop Video panel.


Exporting the cropped video


When a user has determined which portions of their video they would like to crop, they can finalize the process by clicking on the Export button in the upper right-hand corner of the workstation. Clicking on the Export button will then open up the Save as File Name pop-up window within the software. Within this pop-up window, users of the software can give their exported file a name within the Export File Name section, as well as initiate the export process by clicking on the Export button. On top of this, users can also schedule the file to be exported at a later date by choosing a day within the drop-down menu calendar located under the Schedule section.

When the video exportation process has been completed users will be able to access the redacted video within the Project Files panel in the software. After clicking on the video, users can watch the redacted video to ensure that the video has been cropped correctly. To this point, users can access their redacted video on their local machines by clicking on the Open Project Folder button within the Project Files Panel, as shown in the screenshot below. This will take users to the file explorer on their respective machines, and allow them to view their redacted video on any media player that may have been installed.


The method of video cropping is one of the easiest ways to make changes and adjustments to a video recording. Likewise, the video cropping tool within CaseGuard Studio gives users of the software the option to cut portions of their videos in a manner that is both straightforward and efficient. From content creators that are looking to enhance the viewing experience of the consumers that watch the videos to a government official that may need to crop a video in order to comply with a Freedom of Information Act (FOIA) request, users can edit their video recordings in CaseGuard Studio without any unnecessary hassle.