How To Redact Faces in a Video
May 27, 2021 | 4 minutes read
As personal information is being shared online more than ever before in the form of social media, dashcams, and surveillance camera video footage, the need to redact (blur) information from videos is more important than ever before.
While redaction has historically been a tedious and painstaking process that was undergone by hand over the course of many days, weeks, or even months, there are now automatic video redaction software options that will do this same process automatically in only a matter of minutes. What’s more, these software programs allow users to redact objects within specific categories, such as faces, license plates, and device screens. With automatic video redaction, users can easily redact (blur) personal information while spending as little time, effort, and resources as possible.
Create a Project and Add a File
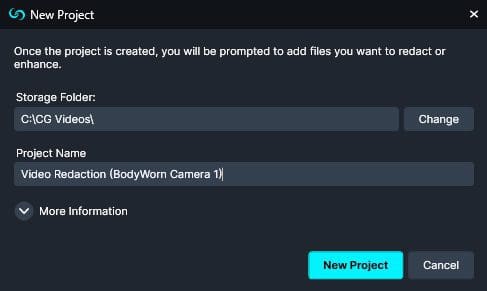
The first step to redact (blur) faces using automatic video redaction software is to create a project within the system. Users can do this by clicking on the folder button and selecting “New Project” from the drop-down menu as shown in the example below. Users will then be prompted to give the project a name and select where on their hardware or storage device they would like to save the project. After creating a new project, the next step is to upload whatever video is being redacted to the automatic video redaction software.

Redact (Blur) Faces Automatically
After adding a video to the software, users will then select the automatic face detection feature represented by a smiley face  , users will then be shown a list of options concerning the automation of the video redaction process.
While faces are being redacted in this particular instance, users also have the option to redact (blur) objects in other categories including screens, license plates, paper, people, signatures, barcodes, checks, and vehicles. These redactions can also take the form of 5 distinct shapes including circles, triangles, rectangles, diamonds, and ellipses. What’s more, users also have the option to place a variety of both redaction and enhancement effects within these categories.
In our example, we will simply do the following:
- Select Faces/Heads.
- Apply to “Whole File”.
- Select “Rectangle” as a shape.
- Select “Blur” as a Video Effect.
- Change the level of the blur as needed.
- Click “Start Now” to start the automatic face redaction.

After users have selected automatic face detection and started to process the video, any faces or objects that the software perceived as being faces will be represented by a thumbnail in the objects detection panel. Moreover, the objects detection panel also provides users with a confidence level concerning the accuracy level of the redaction in question.

In the example above, the system has clearly detected a man’s head, as evidenced by the thumbnail showing his head as well as a confidence level of 100%. Additionally, the detection panel also contains a search bar that will allow users to filter what has been detected even further.

Conversely, In the example above, the automatic video software has picked what appears to be a head. However, the thumbnail is not entirely clear, and the software has given a low confidence level of only 36% as a result. Despite all of this, users can still select the go to position button, represented by the reticle icon in the software, to gain a better understanding of what exactly the system detected and automatically redacted.

After users have observed the quality and effectiveness of a certain detection, they then have the option to leave it in the video or delete, disable, or lock it, represented by the three dots, eye, and lock symbol respectively, and shown in the examples below.

Users will then have the option to process or export the video, as shown by the progress bar below. This bar will show that the video effects the user selected are being applied to the video, as well as provide a percentage concerning how much longer the software needs to finish the video. The automatic video redaction software will also provide information concerning the user’s last save point. After the video is done processing, users will then be able to look over the video and view the finished product for themselves.
Let’s See It In Action!
In the video below, you’ll learn how to use Automatic Detection mode to perfectly redact (blur) faces with a few clicks.