How to Redact Screens in Videos Using CaseGuard
July 12, 2022 | 5 minutes read
From Apple’s newest iPhone and iPad products to traditional GPS systems within automobiles, people all over the world use screens to access a wide variety of technological products on a daily basis. In the context of video recordings, the presence of these screens could represent a source of personal information under certain circumstances, even more so, as high-quality cameras have become more accessible during the past 20 years. For instance, a simple phone call that is captured via a video camera could disclose an individual’s first and last name, as well as a picture of their face. With all this being said, users can redact the screens of mobile and smartphone devices with relative ease when using CaseGuard Studio.
Automatic AI Detection

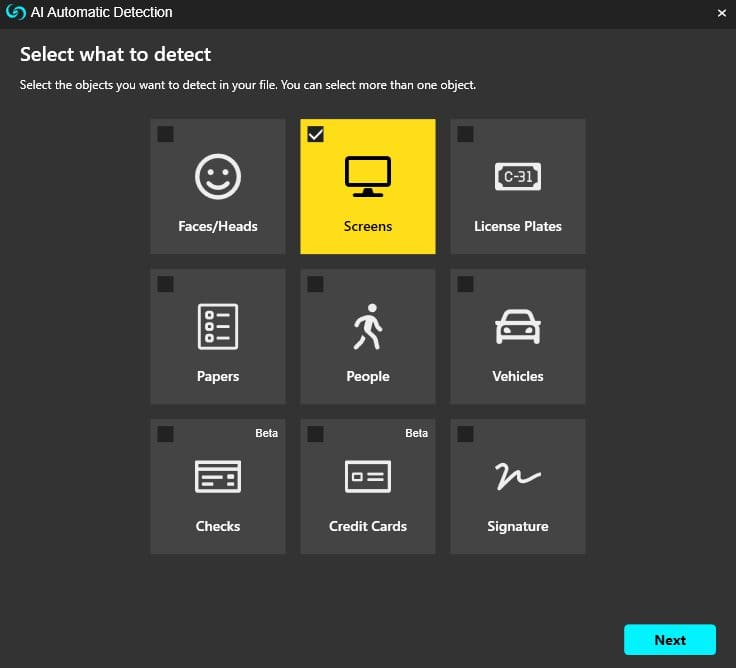
To begin the automatic screen redaction process within CaseGuard Studio, users can click the Automatic Screen Detection tool located on the left-hand tool of the software. Clicking this tool will then take users to the AI Automatic Detection pop-up screen. When accessing this screen, users will notice that the Screens option has already been checked. To this point, users can click the Next button within the lower-right corner of the pop-up window to choose the redaction shape and effect they would like to use to obscure the screens within their video recording. For context, users of CaseGuard Studio can redact objects and information within videos in accordance with four distinct shapes, as well as dozens of visual effects.

This being said the Rectangle shape and Pixelate effect combination is particularly effective at redacting the screens of technological devices. After a user has selected the redaction shapes and effects of their choosing, they can then click the Next button to move the process along. Subsequently, users can choose to apply their redaction work to their entire video file by selecting the Whole File option or within a specific range within their video by clicking the Selected Range option, in accordance with the time stamps that correspond to the portions of the video they want to redact, as well as the frames within the video. After a user has decided the extent to which they want to redact their video, they can click Next again and then click the Apply button to initiate the process.
Objects detection panel
Once the automatic screen detection process has been initiated, users will be able to see every screenshot within their video where a screen was identified by scrolling through the Objects Detection panel in the software. To do this, users can click on the Objects Detection tab within the right-hand section of the software and then click on the Pin icon to pin the panel to the workspace. When navigating the Objects Detection panel, users will see every screen that was detected within their video recording, as well as the number of frames in which a screen was detected. What’s more, users can also see the exact point within their video where a particular screen was detected by clicking the Go To Position button.
On top of this, users can also see a visual representation of every screen that was detected within a particular portion of their video by clicking on the View All button within the Objects Detection panel. This will then take users to the Objects Detection pop-up window. Within this pop-up window, users can gain a greater level of insight into the screens that were detected within a particular section of the video they are redacting, as well as the Confidence Level for each detection that the system has made. This Confidence Level refers to the accuracy of the system in detecting a particular object, in this case, screens, on a scale of 0% to 100%.

Should a user notice that the system has detected another physical object within their video that is not a screen, they can also click on the Disable button next to the thumbnail of the particular object within the Objects Detection panel to disable that particular detection within the video. Furthermore, there is also a Delete button within the Objects Detection panel that enables users to remove a detected object altogether, although this detection cannot be retrieved again once it has been removed and as such, should be used sparingly. On the other hand, there is also a Lock button within the panel that can be used to ensure that objects of interest in a video are not disabled or deleted accidentally.
Exporting the video

After the automatic screen detection process has been completed, and users have used the numerous features and tools within the Objects Detection panel to confirm that all screens within the recording have been picked up by the software in an effective manner, they can then finalize the redaction process by clicking on the Export button in the upper right-hand corner of the software. This will then take users to the Save as File Name pop-up screen, from which they can click the Export button to begin the exportation process. When the process has been finalized, users will be able to watch their redacted video by clicking on the appropriate thumbnail within the Project Files panel underneath the Export button, which will allow said users to view the video within the CaseGuard Studio media player.
As mobile and online technology continues to be developed and implemented within modern-day society, devices that contain touch screens and smart capabilities will only become more prevalent. To this point, many business professionals will undoubtedly be faced with scenarios where they need to redact these screens from video recordings, whether this is to maintain compliance with a data protection law or to protect the personal information and privacy of a specific individual. Irrespective of the reason for which a user desires to redact a mobile or smart device’s screen from a video, CaseGuard Studio’s software has everything they need to get the job done.