What is Redaction Pool?
The Redaction Pool feature is a team collaboration tool that allows you to work with your team on a specific folder that contains a collection of different media files, including videos, audio, images, and documents.
Using the feature, you can simply share a folder called “Pool” with your team, and all the members of your team can begin working on the various files contained within the “Pool.” What’s more, the “Pool” will also display which member of your team is working on a particular file, as well as the stage they are on as it pertains to that particular file. When a team member is done with a specific file, they can mark it as complete and an exported file will be added to the “Export” destination folder.
How to Locate the Redaction Pool?
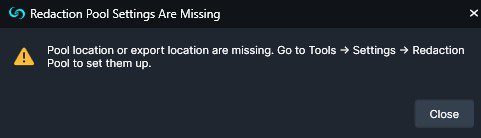
You can find the Redaction Pool tool ![]() in the shortcut bar panel, when you click on this tool for the first time, it prompts you to set up your redaction pool:
in the shortcut bar panel, when you click on this tool for the first time, it prompts you to set up your redaction pool:
What are the benefits of using the Redaction Pool?
The Redaction Pool feature gives users of our software the ability to collaborate and work together on files of their choosing. As a user working within the Redaction Pool feature, you will be able to check the status of the pool at any time, see what members of your team are working on a particular file, and ultimately, choose which file you’d like to begin working on yourself.
Organizations holding multiple licenses find that they save significant time in communicating the status of a collaborative redaction project. The feature eliminates the constant need for updates on a project as everything is conveniently accessible within the shared Pool!